Categories
blog exchange howto server windows

Exchange database dirty shutdown recovery JET_errLogFileSizeMismatch error -541

Warning: This is a technical article describing steps that you should only execute if you’re familiar and confident with the matter.

Error information:
Below is some error information that you might have seen and that’s why your search leads you here.

eseutil /ML “L:\Program Files\Microsoft\Exchange Server\V15\Mailbox\DB-MBX2\E02.log”
Extensible Storage Engine Utilities for Microsoft(R) Exchange Server Version 15.00
Copyright (C) Microsoft Corporation. All Rights Reserved.
Initiating FILE DUMP mode…
Base name: E02
Log file: L:\Program Files\Microsoft\Exchange Server\V15\Mailbox\DB-MBX2\E02.log
ERROR: Cannot read log file header. Error -541.
Operation terminated with error -541 (JET_errLogFileSizeMismatch, actual log file size does not match JET_paramLogFileSize) after 0.16 seconds.

eseutil /r “L:\Program Files\Microsoft\Exchange Server\V15\Mailbox\DB-MBX2\E02.log”
Extensible Storage Engine Utilities for Microsoft(R) Exchange Server Version 15.00
Copyright (C) Microsoft Corporation. All Rights Reserved.
Initiating RECOVERY mode…
Logfile base name: E02

Performing soft recovery…
Operation terminated with error -541 (JET_errLogFileSizeMismatch, actual log file size does not match JET_paramLogFileSize) after 0.31 seconds.

Solution:
If possible have a backup or a copy of the database before you manipulate it! Transaction log files are critical for the database, these are not just information files that you can delete!

If the DISK where the log files of your exchange database resides has run out of space you could find yourself with a corrupt log file. When you try to perform a soft recovery with eseutil /r and the path to your E0?.log (in my case E02.log) file you get an error about header information and size mismatch. The E0?.log file is the current transaction log file that Exchange was writing to when the disk ran out of space. This file is now corrupt and transactions in the file that were not applied to the database will be lost. All other older log files will have hexadecimal sequence to it such as E0?00E475A.log and so on. You can check which log files are required for the database to perform a soft recovery by reading the header information of the database in question as follows:

eseutil /mh “F:\Program Files\Microsoft\Exchange Server\V15\Mailbox\DB-MBX2\DB-MBBX2.edb”
replace path and filenames with your database

In the wealth of information returned you will see a line stating the state of the database, which will be Dirty Shutdown. (If it is Clean Shutdown than you do not need to perform recovery). Below the state is the line Log Required which shows the files needed.

Log Required: 190299-190336 (0x2e75b-0x2e780)

In my case the databases needs the files E020002E75B.log and newer on to E020002E780.log (this is HEX sequence). Older log files can be moved to a different hard disk if you need to free some space. Be careful, don’t delete, sorting these files in Explorer is not easy, you can’t do it by name because of the hex sequence and by date/time is not foolproof. So double-check or just expand the disk and leave all log files as-is.

Now to perform the recovery we have to move the corrupt E02.log file to a folder or other disk. Now that the corrupt file is removed and you are 100% sure that all the other required log files (see section above) are present we can perform soft recovery with the /a option to skip missing log files and bring the database back to a clean state.

eseutil /r /a E02 /l “l:\Program Files\Microsoft\Exchange Server\V15\Mailbox\DB-MBX2” /s “l:\Program Files\Microsoft\Exchange Server\V15\Mailbox\DB-MBX2” /d “F:\Program Files\Microsoft\Exchange Server\V15\Mailbox\DB-MBX2”
change the names and paths to your situation.

/r is soft recovery
/a is skip missing logfile
E02 is the base name of the logfiles, this is dependant of the database, could be E01, E02, E03 …
/l is for the log files location (where E02.log and other E02xxxx.log files reside)
/s is for the system files location (where E02.chk resides)
/d is for the database files location (where DB-MBX2.edb resides)

Output will be like this:

eseutil /R /a E02 /l “l:\Program Files\Microsoft\Exchange Server\V15\Mailbox
\DB-MBX2” /s “l:\Program Files\Microsoft\Exchange Server\V15\Mailbox\DB-MBX2” /d
“F:\Program Files\Microsoft\Exchange Server\V15\Mailbox\DB-MBX2”

Extensible Storage Engine Utilities for Microsoft(R) Exchange Server Version 15.00
Copyright (C) Microsoft Corporation. All Rights Reserved.
Initiating RECOVERY mode…
Logfile base name: E02
Log files: l:\Program Files\Microsoft\Exchange Server\V15\Mailbox\DB-MBX2
System files: l:\Program Files\Microsoft\Exchange Server\V15\Mailbox\DB-MBX2
Database Directory: F:\Program Files\Microsoft\Exchange Server\V15\Mailbox\DB-MBX2
Performing soft recovery…
Restore Status (% complete)
0 10 20 30 40 50 60 70 80 90 100
|—-|—-|—-|—-|—-|—-|—-|—-|—-|—-|
……………………………………………

Operation completed successfully in 3.635 seconds.

The database is now clean, you can check again with eseutil /mh as we did before and see the state listed as Clean Shutdown.

If you want to quickly clean-up logfiles no longer needed you should perform an Exchange aware backup. If you don’t have one and you understand the consequences you can enable circular logging on the database.

Good Luck!
Categories
blog howto windows

Microsoft Print to PDF empty 0KB file

If you create a PDF file using “Microsoft Print to PDF” and the file is corrupt and appears empty 0KB. Try to make the file again but don’t use “,” (comma) in the name.

Categories
blog exchange howto server windows

Outlook 2013 sync problems and message that Administrator has made a change

This post describes a problem I recently experienced when migrating from Exchange 2007 to Exchange 2013. Outlook 2013 clients would pop-up a message about the administrator making changes that require a restart of Outlook continuously. Also the folder synchronization fails and you see new messages arrive in your Inbox only to dissapear again after 1 second and then come back again and so forth.

The Microsoft Exchange administrator has made a change that requires you quit and restart Outlook

outlook error synchronizing folder [0-0]

These problems started occurring right after the old public folder database was deleted on the Exchange 2007 server. I only noticed it after I had already uninstalled the Exchange 2007 server completely. Why only Outlook 2013 has this problem I don’t know, but here is what’s wrong.

On the Mailbox database on your new Exchange server there is still a value pointing to the OLD public folder database that is now deleted.
You need to fix this using Adsiedit.msc:
Go to:

Configuration >CN=Services > CN=Microsoft Exchange > CN=Your Organisation > CN=Administrative Groups > CN=Exchange Administrative Group > CN=Databases

For each mailbox database, right click and check the attributes for “MSEXCHHomePublicMDB”. You will see that the value for this attribute points to “CN=Public Folder Database*,CN=Deleted Objects,CN=Configuration,DC=YourDomain,DC=com” the old object for the public folder database that has been deleted. You must clear this value using the clear button, so it changes to “not set”, just emptying the value won’t work. Restart the Information store service or reboot the Exchange server and the problem should be solved.

Categories
blog howto windows

Citrix client receiver error AllowHotkey

This problem can be solved by either disabling lockdown on the client or adding a registry key on the client for allowhotkey.

—————————
Error number 2320
—————————
Citrix online plug-in Configuration Manager: No value could be found for (AllowHotkey) that satisfies all lockdown requirements. The lockdown requirements in force may be conflicting.
—————————
OK
—————————

option 1 (disable lockdown)
HKEY_LOCAL_MACHINE\SOFTWARE\Wow6432Node\Citrix\ICA Client\Engine\Lockdown Profiles\All Regions
Enablelockdown change to 0

option 2 add reg key for AllowHotkey with empty value
HKEY_LOCAL_MACHINE\SOFTWARE\Wow6432Node\Citrix\ICA Client\Engine\Lockdown Profiles\All Regions\Lockdown\Client Engine\Hot Keys
“AllowHotkey”=””

Categories
howto windows

Windows 10 Upgrade error unable to install on partition

EDIT: I read somewhere that it needs 50MB of free space on the partition. Maybe you can first assign a drive letter using disk management and see if you can free up some space.

I had this “Something went wrong” & “unable to install on partition” error when I tried to upgrade a Laptop with Windows 7 Home Premium 64-bit installed. This laptop is from late 2011, and had Windows 7 pre-installed by the manufacturer.

This cryptic error, in my case, just meant that the hidden reserved system partition that Windows 7 creates on install was too small/full for Windows 10.

In earlier versions of Windows 7 this partition would be created with a size of 100MB. In Windows 8 I mostly see this partition with a size of 400MB.

So what to do? Expand this hidden system partition from 100MB to at least 400MB. To be safe for the future I expanded it to 800MB.
Now this is not something you can do from within Windows, because the C partition will have to shrink AND move to the right to make room to expand the system partition.

I suggest using a partition manager to do this. I had success using the free Minitool partition manager.
http://www.partitionwizard.com/free-partition-manager.html

First select the C partition and shrink by 700MB and move it to the right so that the free space comes available in between the small SYSTEM partition and the C partition. Then next select the SYSTEM partition and expand by 700MB until the free space is gone.

Now click the execute button, the software will tell you it must reboot to execute these actions.
Go ahead reboot, and then wait for some time (could take up to hours on big and slower drives) for the software to finish. You get a nice progress bar. For me it took 10minutes on an SSD.

When it’s finished it will boot Windows and you can check in Disk Manager if everything looks good. You can then uninstall or keep the software and start your Windows 10 Upgrade again.

Categories
blog howto windows

Windows 10 upgrade reservation notification icon not showing

Can’t See the Windows 10 Upgrade Notification?

How to display the Windows 10 upgrade icon if it is not visible:

I have seen the windows 10 upgrade notification appear on Windows 7 SP1 & 8.1 computer just fine.

Let me start out by saying this: “When the computer is joined to an active directory domain the icon will not show”. Not matter how hard you try to manually get it started by triggering the tasks or runing the GWX.EXE or GWXUX.EXE applications. It won’t work (for now?) on domain joined computers. Not even if you logoff and logon using a local administrator account.

When you remove your active Directory domain membership and put the computer in a workgroup you will see the icon after the reboot. You can then make your reservation, but I don’t think it will actually download the upgrade on July 29th if the computer is joined to the domain again, not sure about that.

If you’re a home user not connected to an active directory domain there are some things to check:
– You need to be on Windows 7 SP1 or Windows 8.1 Update1
– You need to have the KB3035583 update installed

If you still have trouble getting the icon you can try the BAT file created by a Microsoft Answers forum moderator.
https://www.dropbox.com/s/0u0au9xgy6ss18p/win10fix_full.zip?dl=0 (no need to register at dropbox just skip,
download and unzip the BAT file in the C:\TEMP directory (create dir if needed).
Open a CMD with administrative rights.. (right click on CMD icon in start menu and choose Run as Administrator)
CD c:\TEMP
win10fix_full.bat
Follow the instructions …

Categories
blog exchange server windows

Outlook Web Access OWA error 500 when logging in

When you fill in your credentials on the login screen of Outlook Web Access or OWA (2010) and click submit you receive an Internal Server Error 500 and the URL shows /owa/auth.owa

There are no events logged in Application or System log that explain this problem.

IISreset does not help.

The problem and solution could be very simple.
Check the the service “Microsoft Exchange Forms-Based Authentication service” is started. If not, start the service and try to login to OWA again. Problem should be solved.

If the service doesn’t start or fails frequently you’ll have to investigate that further.

Categories
blog howto server windows

printer driver installation error 0x00000057

note: This is a technical article meant for system administrators or advanced users. Make backups of files or registry keys that you manipulate. Use caution and proceed at your own responsibility.

I ran into this problem after cleaning up printer drivers and manually cleaning up in the c:\windows\system32\spool directory.
When trying to connect to a printer on the printserver the error 0x00000057 would show. This error occurs when windows tries to install the printer driver.

If the driver is already present on the system, first try to remove the printer driver using the printserver properties (printui.exe /s /t2). http://support.microsoft.com/kb/2771931 After remove try again to install. If that didn’t work, or like me this particular driver was not installed on the system, read on.

If you have another computer or server that does install the printer without problem, than you can try this.
1) On the working computer open the registry editor and navigate to: (note for 32bit systems its slightly different)
HKEY_LOCAL_MACHINE\SYSTEM\CurrentControlSet\Control\Print\Environments\Windows x64\Drivers\Version-3\
2) Find the key with the driver you need. Export this driver key to a REG file. Copy the file to the problem computer.
3) On the problem computer open the registry editor and check for the presence of the key, delete if present.
4) Import the REG file made in step 2 on the problem computer.
5) In the key note the value of the Infpath item. It’s the location of the INF file. We need the whole containing folder and items in it.
Should be something like: c:\windows\system32\DriverStore\FileRepository\xxx.inf-yyyyyy-zzzzz\
6) We need to copy this folder and its content to the problem computer. Not an easy task because of the permissions.
But you can do it like this from the working computer:
– Open an elevated command prompt (run as administrator CMD.exe)
– execute the following command: xcopy C:\Windows\System32\DriverStore\FileRepository\xxx.inf-yyyyyy-zzzzz\ \\problemcomputer\c$\Windows\System32\DriverStore\FileRepository\xxx.inf-yyyyyy-zzzzz\ /E /C /F /H /R /K /O
7) Now we have the registry key and the files present on the problem computer.
8) Restart the print spooler on the problem computer and try to connect the printer again or try to install the driver again.

0x00000057 printer driver installation error
source: https://social.technet.microsoft.com/Forums/itmanagement/en-US/a225d71c-be8b-4530-bf50-63001559a978/windows-can-not-connect-to-the-printer-0x00000057?forum=itmanager

Categories
blog network server windows

FreeRadius.net service doesn’t work

The FreeRadius.net package built for windows uses the XYZservice.exe wrapper tool to start a normal application as a service. However on Windows 2008 and higher the service starts but RADIUS is not listening on the configured ports. You can check if it is listening with netstat.
netstat -an | findstr 1812

The Debug mode of FreeRadius.net (using the provided batch file) however works fine. It seems the built radiusd.exe will not start with the default options on Windows 2008 and higher. You can check this by manually starting from a command prompt:
C:\FreeRADIUS.net\bin\radiusd.exe -f -d C:/FreeRADIUS.net/etc/raddb
So that is the reason why the service doesn’t start.

Solution: COnfigure the XYZservice to start the application with the debug parameters.
Edit C:\FreeRADIUS.net\bin\XYZservice.ini
change:
CommandLine = C:\FreeRADIUS.net\bin\radiusd.exe -d C:/FreeRADIUS.net/etc/raddb -AX

Now if you start the FreeRadius.net service and check with netstat you will see the RADIUSD.exe listening

Categories
blog network server windows

RAS or NPS forward RADIUS request to same server different port

The address of the remote RADIUS server x.x.x.x in remote RADIUS server group yyyyy Resolves to local address x.x.x.x.
The address will be ignored.

Use case scenario: You want to forward RADIUS requests incoming on the server to some software, possibly for setting up OTP authentication.

My scenario: Extra security for PPTP vpn tunnel to Windows server with RAS (Routing and Remote Access) by using VASCO Identikey OTP (One-Time-Passkey) software (the same applies for other software such as RSAid). Normally the recommended setup is using two servers, one for the RAS connection and one with the VASCO Identikey middleware software on it. When you deploy like this you will not face the problem I’m about to describe. However if you have only 1 Windows server at your disposal and you install the VASCO Identikey software on the same server as the RAS and NPS (Network Policy Server) role you will run in to this problem.

Problem description: You have configured RAS correctly for PPTP MSCHAP v2 connections. In NPS you have configured a connection policy to forward the RADIUS requests (authentication and accounting) to a remote RADIUS server group. The authentication fails, VASCO audit viewer does not show any attempt to authenticate to the VASCO Identikey Radius server. In the eventviewer application log there is an event ID 25 with the following error:
The address of the remote RADIUS server x.x.x.x in remote RADIUS server group yyyyy Resolves to local address x.x.x.x.

The problem is that NPS cannot forward RADIUS requests to the same IP address as itself. Even if the software is listening on another port, or you configure 2 IP addresses on the same network card. NPS insists that the IP address of the remote RADIUS server is the same as it’s own IP address and ignores your configuration to forward the RADIUS requests.

The solution is to use the loopback IP address range. For example 127.0.0.2. Unfortunately VASCO Identikey is licensed on IP address and as such you can’t change it to listen to the loopback IP address without also requesting a new license. I have not tried this, so even with the new license I’m not sure VASCO Identikey will listen on loopback IP address. Maybe other OTP software can do this, check with your vendor or manual.

What can you do? Use a RADIUS proxy to sit between the NPS and VASCO Identikey. If you have a linux server around you can use opensource FreeRadius software on that linux box to proxy the RADIUS requests between RAS/NPS and VASCO Identikey.
If like me you had nothing but this 1 windows server, you can use the FreeRadius.net software, this is a prebuilt binary of the opensource FreeRadius software made for windows versions. The software is quite old and not updated but it still seems to work for our simple setup.

I have installed the FreeRadius.net software in C:\FreeRadius.net
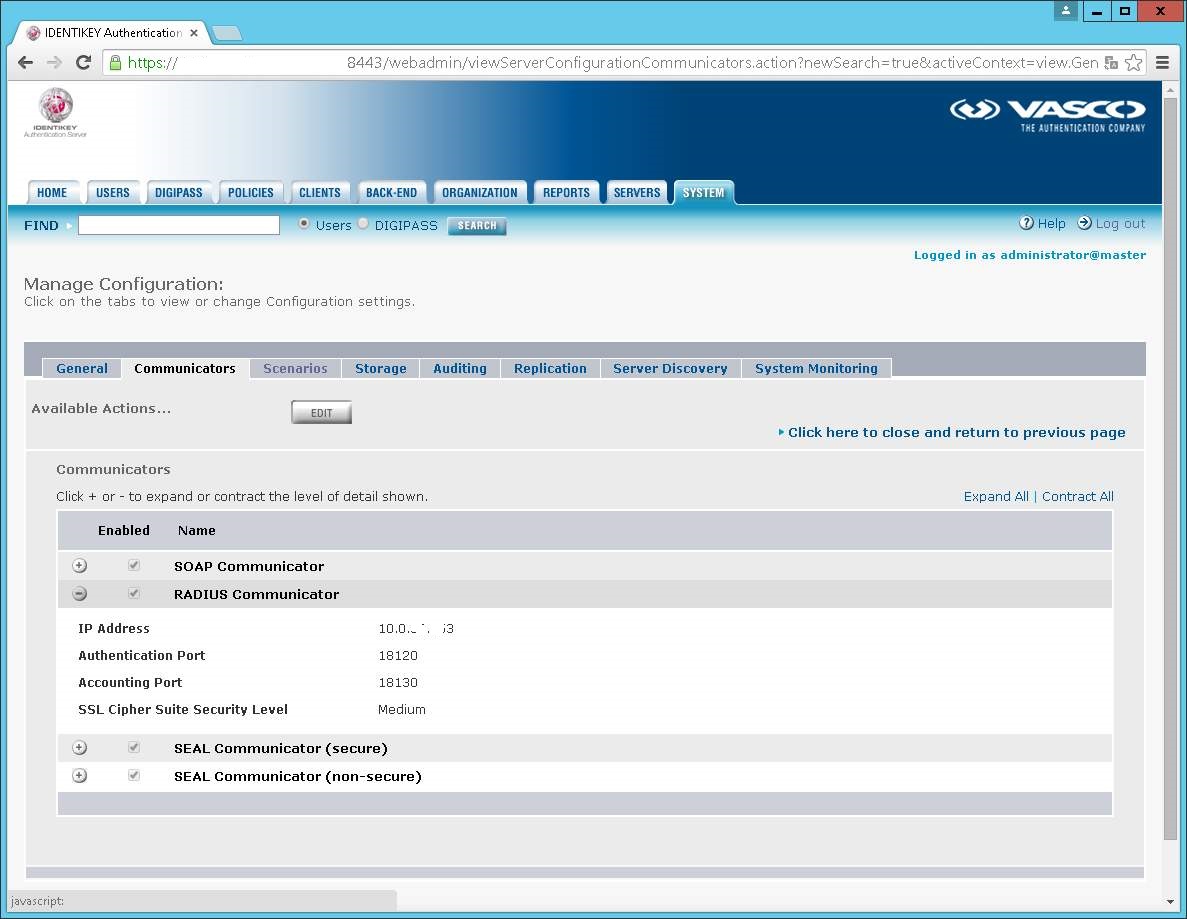
I have configured it to accept RADIUS requests on interface 127.0.0.2 port 11812 and forward them to a RADIUS server on IP x.x.x.x on port 18120 (I changed the default RADIUS ports for VASCO and FreeRadius to avoid conflicts with NPS/RAS).

configuration file c:\FreeRadius.net\etc\raddb\clients.conf
I have put all the default things in comment (#) and add
client 127.0.0.2 {
secret = testing123
shortname = localhost2
}

configuration file c:\FreeRadius.net\etc\raddb\radiusd.conf
I have put the default listen directive in comment (#) but you must leave the bind = * line and add
listen {
ipaddr = 127.0.0.2
port = 11812
type = auth
}
listen {
ipaddr = 127.0.0.2
port = 11813
type = acct
}

configuration file c:\FreeRadius.net\etc\raddb\proxy.conf
In this file I configured both the NULL realm for plain usernames and the DEFAULT realm for all others to forward to VASCO Identikey wich I have listening on the port 18120 & 18130 (auth & acct).
# This realm is for requests which don't have an explicit realm
# prefix or suffix. User names like "bob" will match this one.
#
realm NULL {
type = radius
authhost = 10.x.y.z:18120
accthost = 10.x.y.z:18130
secret = testing123
}

#
# This realm is for ALL OTHER requests.
#
realm DEFAULT {
type = radius
authhost = 10.x.y.z:18120
accthost = 10.x.y.z:18130
secret = testing123
}

You can now start the FreeRadius.net in debug mode, using the supplied batch file you can test your configuration.

Below I will attach screenshots of my configuration for NPS, RAS and VASCO.
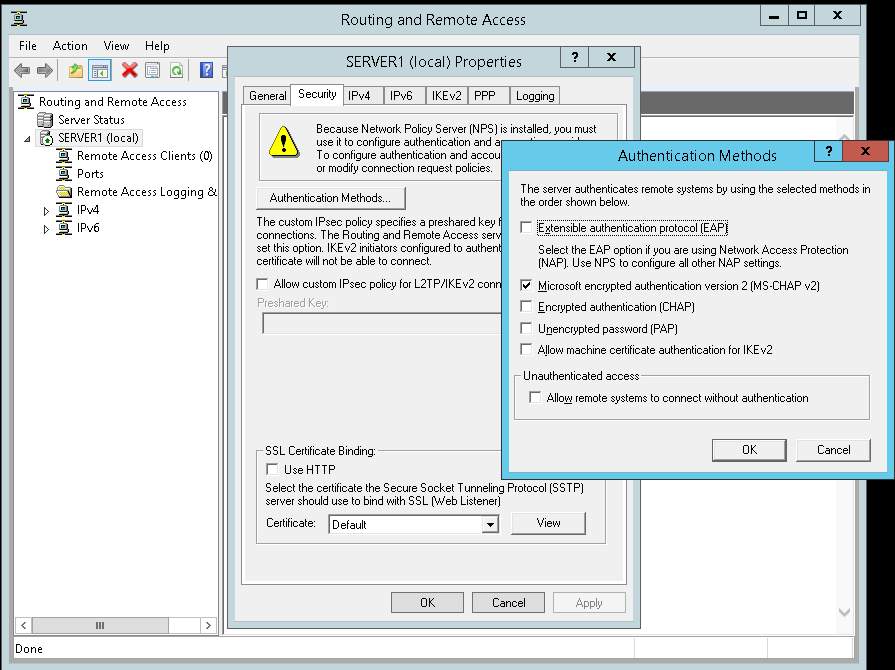
RAS settings (EAP can be enabled if you like)
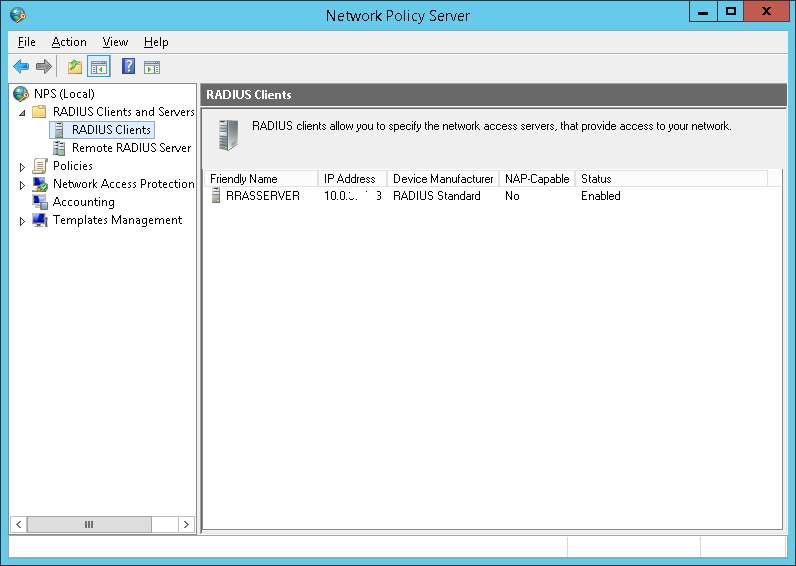
NPS RADIUS client
NPS configure remote RADIUS server group
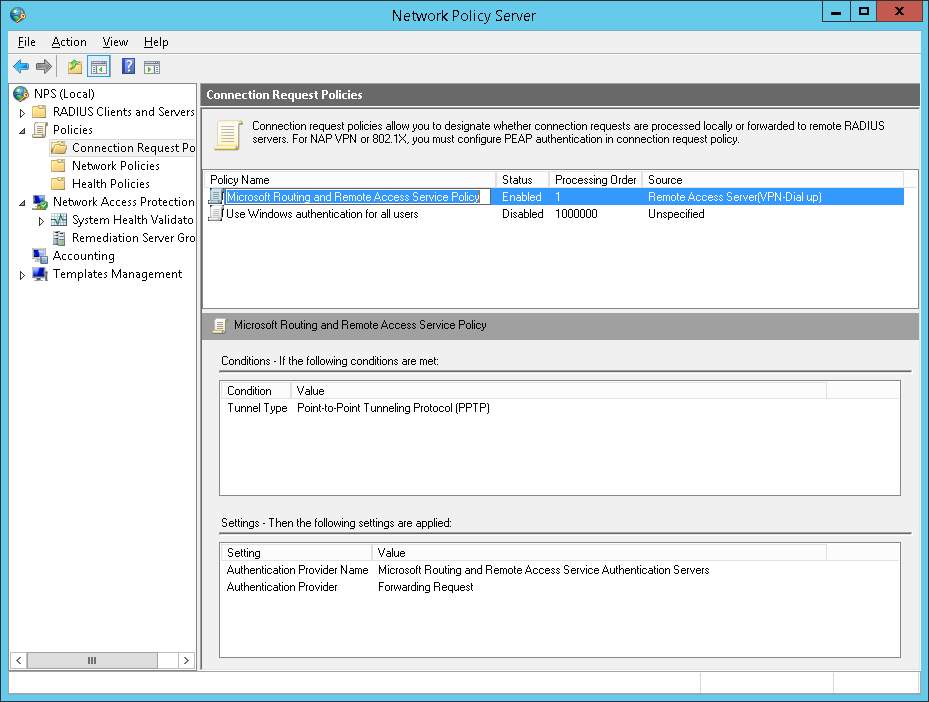
NPS connection policy screenshot
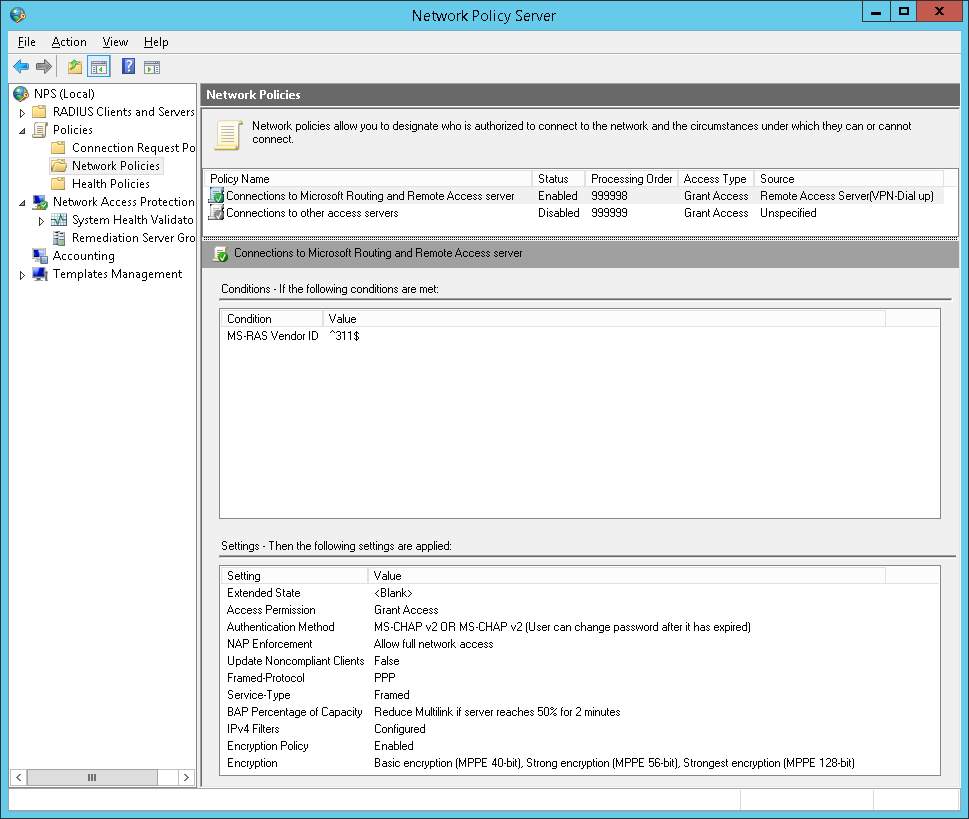
NPS Network Policy
VASCO port settings

With thanks to:
http://bent-blog.de/vasco-identikey-server-auf-microsoft-forefront-tmg-2010/