Categories
blog howto windows

Windows 10 May 2021 update can break audio service

Problem:
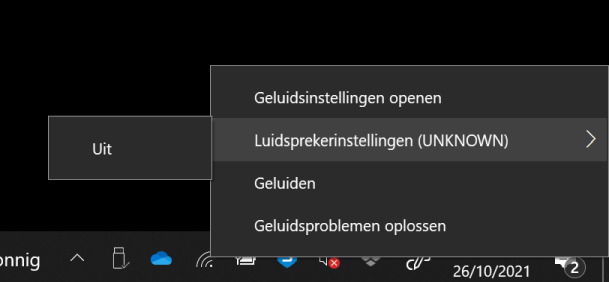
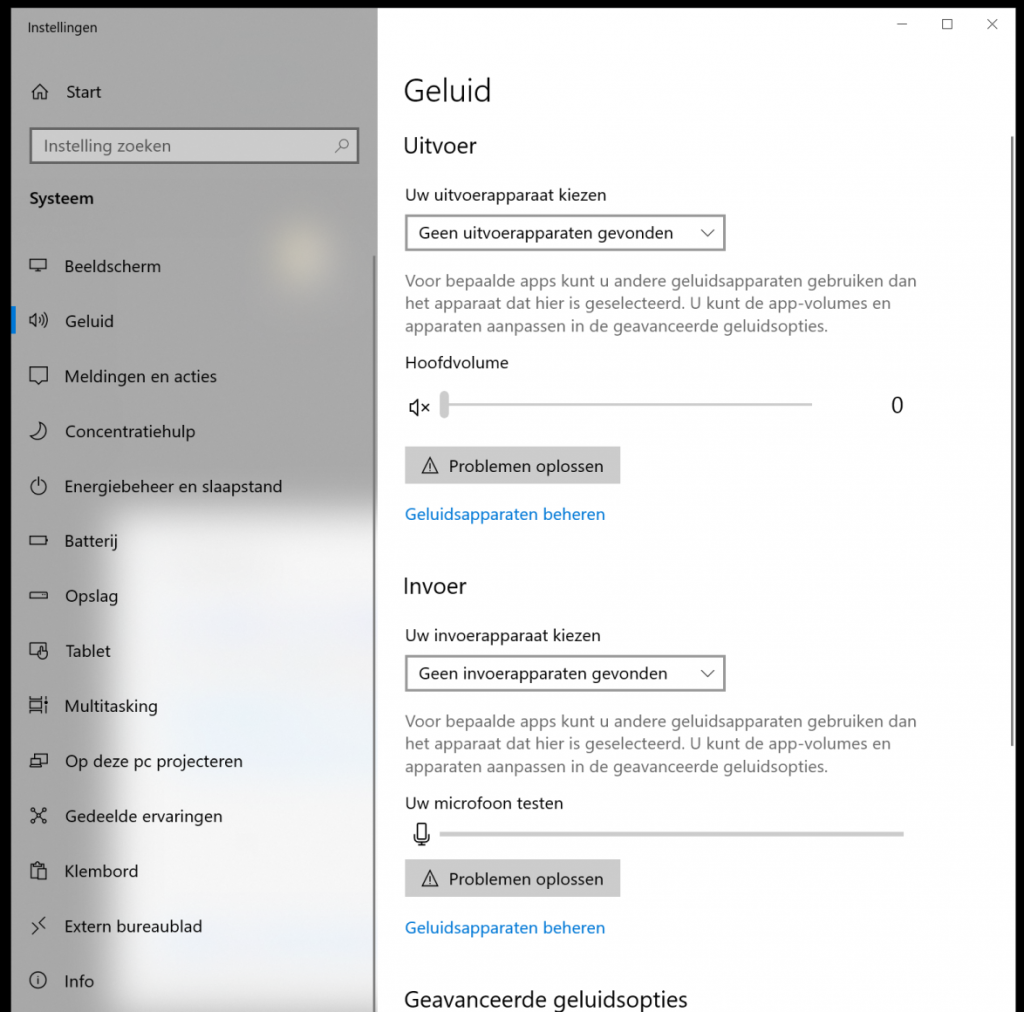
Sound is not working anymore in Windows and all programs. In the task area the speaker icon shows a red circle with an X. When you open sound settings it says there are no devices. In device manager the sound card is enabled and shows the correct latest driver.
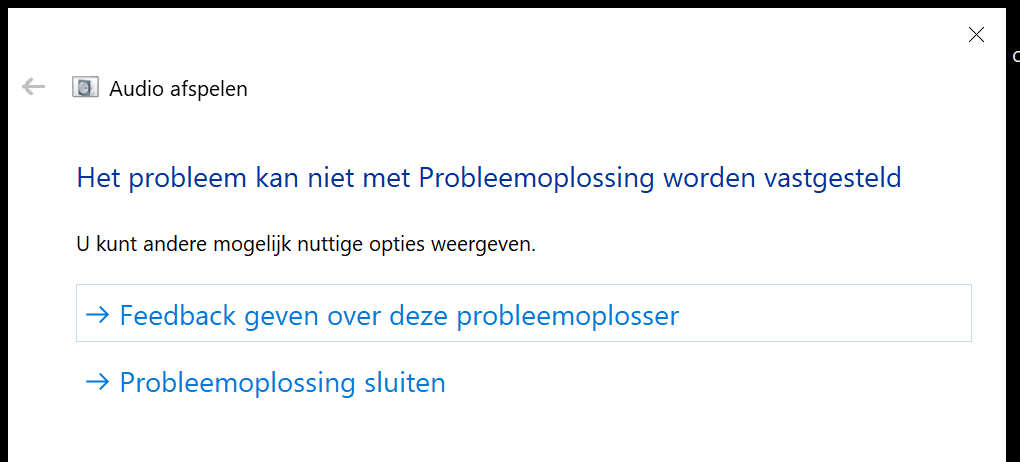
Troubleshooting:
Removing (with delete driver) all the sound devices and output devices and reinstalling them has no effect. DISM /ScanHealth and SFC /scannow find no corruption. After trying lots of possible solutions, including doing a build upgrade to the same version, I was almost at the point that I would reset the entire system and install everything again. However in one last desperate Google search I came across the solution.

Solution:
The first solution I found was to add the localservice and networkservice (hidden) user accounts to the local administrators group. I tried this and sure enough this fixed the issue. But after reviewing other comments and checking on another (correctly working) computer I was convinced this was not a secure solution. So I removed the user accounts again from the group and sure enough the problem was back (after reboot). Luckily someone at the Dell forums found the real and secure solution.

The problem is a corrupted registry value that defines the Windows ACL rights for some part of the Windows Audio service. So open the registry editor (regedit) and navigate to the following key:
HKEY_LOCAL_MACHINE\SYSTEM\CurrentControlSet\Control\Terminal Server\WinStations

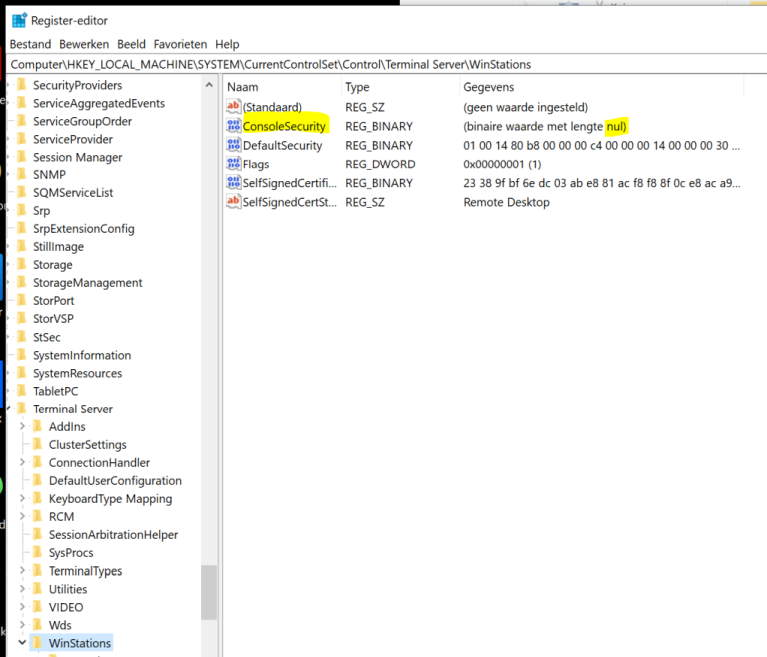
The issue is the value for ConsoleSecurity shows as binary null or empty and that’s faulty. The value is the same on each computer and should be:

"ConsoleSecurity"=hex:01,00,14,80,9c,00,00,00,a8,00,00,00,00,00,00,00,14,00,00,\
  00,02,00,88,00,06,00,00,00,00,00,14,00,01,00,00,00,01,01,00,00,00,00,00,05,\
  04,00,00,00,00,00,14,00,bf,03,0f,00,01,01,00,00,00,00,00,05,12,00,00,00,00,\
  00,14,00,89,00,0f,00,01,01,00,00,00,00,00,05,13,00,00,00,00,00,14,00,81,00,\
  00,00,01,01,00,00,00,00,00,05,14,00,00,00,00,00,18,00,bf,03,0f,00,01,02,00,\
  00,00,00,00,05,20,00,00,00,20,02,00,00,00,00,18,00,21,01,00,00,01,02,00,00,\
  00,00,00,05,20,00,00,00,2b,02,00,00,01,01,00,00,00,00,00,05,12,00,00,00,01,\
  01,00,00,00,00,00,05,12,00,00,00

I have attached a (zipped) reg file you can use to fix this value back to the original value.

More information:
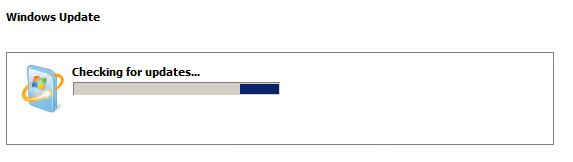
Apparently this happens when the Windows 10 May 2021 cumulative update (KB5003173) fails to install the first time. Somehow in this process the registry value gets corrupted.

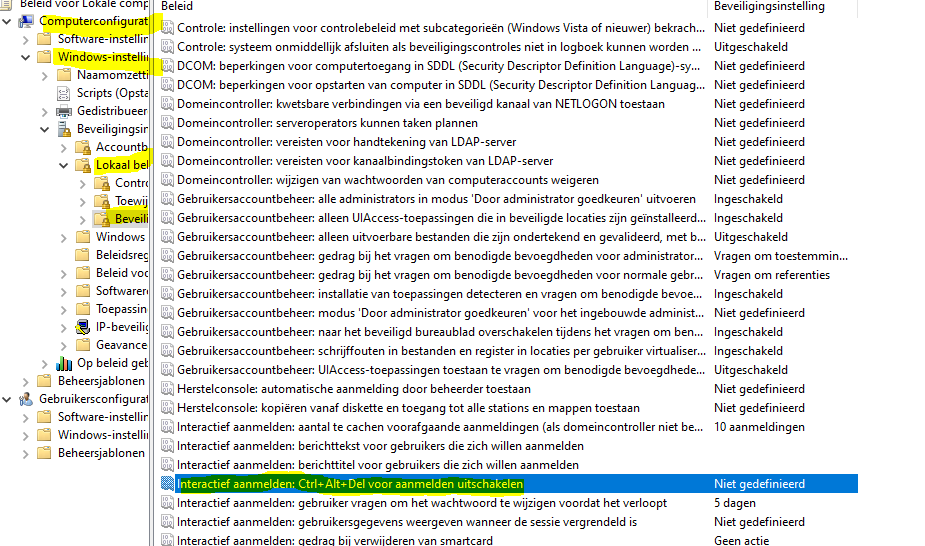
As a side note somehow this update failure also changes the setting in the local group policy that requires you to press CTRL-ALT-DEL at the logon screen.

Resources and credit:
https://www.dell.com/community/Latitude/Latitude-5400-no-sound-after-May-2021-Windows-update/m-p/7980056/highlight/true#M34613
https://docs.microsoft.com/en-us/answers/questions/401440/kb5003173-no-audio-device-installed.html


Categories
blog howto windows

Windows 10 settings doesn’t open

Windows 10 Settings doesn’t work anymore. You see the window opening but then it immediately closes.

In the eventlog you can see an error from DCOM:

Log Name:      System
Source:        Microsoft-Windows-DistributedCOM
Event ID:      10010
Task Category: None
Level:         Error
Keywords:      Classic
Description:
The server windows.immersivecontrolpanel_10.0.2.1000_neutral_neutral_cw5n1h2txyewy!microsoft.windows.immersivecontrolpanel did not register with DCOM within the required timeout.

DISM won’t fix this, the scanhealth and restorehealth options didn’t help.

To fix this follow these steps.
Open a CMD with run as administrator (elevated priveleges) and type:

cd c:\windows
ren ImmersiveControlPanel ImmersiveControlPanel.old
SFC /scannow

After SFC is finished, the settings windows should work again.

Categories
blog howto windows

Cannot upgrade Windows 2008 R2 to 2012 R2 in place

When you run the setup and choose upgrade you immediately get the message from compatibility report “Windows Server 2008 R2 cannot be upgraded to Windows Server 2012 R2 (With a GUI)”.

You need to have Service Pack 1 installed on Windows 2008 R2 to be able to perform the in-place upgrade. Download SP1 from the link below.

https://www.catalog.update.microsoft.com/Search.aspx?q=kb976932

Note: You also need to use a 2012 R2 setup edition in the same language and bit version (64bit).

Categories
blog howto windows

Windows 7 & 2008 R2 Update error 80072EFE

When you try to search for an update you receive an error code 80072EFE

This might happen on systems that have not been updated for many years or that had a clean install with very old install media.

The solution is to manually install KB3138612. Download from the link below.
https://www.catalog.update.microsoft.com/Search.aspx?q=KB3138612

If you can’t install the update, make sure you are running Service Pack 1 for Windows 7 or 2008 R2. Download from the link below.
https://www.catalog.update.microsoft.com/Search.aspx?q=kb976932

After the SP update, reboot and try the KB3138612 update again and reboot again.

Searching for updates should now work!

Categories
blog howto windows

Windows 10 build update fails with 0x80004005

For a while now my work laptop was trying to update to Windows 10’s latest build (2004) but kept failing when almost finished.

You can manually go through the log files (located mostly at C:\windows\panther\ ). See below link to KB928901 for the complete list.
https://support.microsoft.com/en-us/help/928901/log-files-that-are-created-when-you-upgrade-to-a-new-version-of-window

However, I recommend using the much easier SetupDiag tool, also from Microsoft. Download the tool from the below link and save it to a folder Tools on your C: drive (for convenience).
https://docs.microsoft.com/en-us/windows/deployment/upgrade/setupdiag

From version 2004 onwards the tool should run automatically after failed setup, but it didn’t in my case, or did not show the relevant information anyway.

When I manually opened a command prompt (CMD) with administrative privileges and started “setupdiag” it showed me the reason for failing the update.

cd c:\tools
setupdiag

I had to scroll down a little bit in the output and found this:

Error: SetupDiag reports abrupt down-level failure. Last Operation: Finalize Error: 0x80004005 – 0x60016 LogEntry: 2020-07-21 19:00:10, Error SP Operation failed: Update Boot Code. Error: 0x80004005[gle=0x000000b7]

Specifically “update boot code” showed me the problem had something to do with the special EFI partition where the boot files reside (in case of UEFI boot, as I am using).

When I had a look at my partition layout with disk management, I saw a EFI partition (100MB, a bit small) and 2 Recovery partitions (+/- 500MB each) and some unused space in between them. A strange partition layout, I maybe suspect Acronis to be the reason for this.

Warning: What I did next is for advanced users, because it will make Windows stop from booting if not done correctly.
This is only for UEFI boot, not for Legacy boot.

– I deleted the recovery partitions, deleted the EFI boot partition.
– I made a new EFI boot partition and copied the bootfiles to it.

diskpart
select disk 0
create partition efi
format quick fs=fat32
exit
bcdboot C:\windows

– I used a free partition manager tool to expand/move my C partition so the unused space between the partitions was gone.

I tried the Windows Build update again and was successful!

Categories
blog exchange howto server windows

SBS: complete certificate request error

So you created a certificate request on the SBS wizard and now want to complete the request by running the wizard again and importing the CRT certificate file you received, but you get an error.

The imported certificate does not match your web site

If you look in the detailed logfile named TrustedCert.log located at “C:\program files\Windows Small Business Server\Logs” you may find an error reffering to ASN1bad tag.

An exception of type ‘Type: System.Runtime.InteropServices.COMException, mscorlib, Version=2.0.0.0, Culture=neutral, PublicKeyToken=b77a5c561934e089’ has occurred.
Timestamp: 07/10/2019 11:04:25
Message: CertEnroll::CX509Enrollment::p_InstallResponse: ASN1 bad tag value met. 0x8009310b (ASN: 267)
Stack: at Microsoft.WindowsServerSolutions.CERTENROLLLib.Interop.CX509EnrollmentClass.InstallResponse(InstallResponseRestrictionFlags Restrictions, String strResponse, EncodingType Encoding, String strPassword)
at Microsoft.WindowsServerSolutions.CoreNetworking.CertificateProvider.InstallCertResponse(Byte[] certificateBytes)

Luckily you can manually import the certificate and restore the necessary private key from the request using the instructions below.

  1. Open an Microsoft Management Concole (mmc) as admin.
  2. Add the snap-in “certificates” and select computer account.
  3. Now go to Personal – Certificates, right click & select all tasks – import.
  4. Import the CRT file you received from the provider.
  5. Refresh the certificates list. The certificate is now present but without private key.
  6. Double-click the certificate, go to the details tab and copy the serial number. Should be something like: 1e 71 cb 7a ….
  7. Open an CMD with administrator rights and run the following the command: certutil -repairstore my “<serialnumber>”
    Where <serialnumber> is the value from step 6, i.e. 1e 71 cb 7a ….
  8. Refresh the certificate list in the MMC snap-in, the certificate should now show the key icon because the private key is present.
  9. I suggest you make an export with private key and extended properties to store for safekeeping for later use.
  10. I tried the import certificate wizard in the SBS console again, selected the CRT file, it still failed, but now the certificate was configured and the OWA was working again with the new certificate.

References:
https://support.microsoft.com/nl-nl/help/2351321/not-able-to-install-trusted-certificate-on-sbs2008
https://knowledge.digicert.com/solution/SO22327.html

Categories
blog howto windows

Mount network drive shared folder in DOSBOX

Newer versions allow you to mount a shared folder from the network straightforward using the below syntax.
mount P //server/P-share/
* Note the trailing slash, it’s required!

Some (older) versions of DOSBOX do not allow you to mount (a drive letter connecting to) a network share, but you can circumvent this by using a soft symlink.

Let’s say we have a network drive with the letter P: that we want to mount inside DOSBOX.
We create a folder DOSPROGS on the C: drive to hold the symlink (and perhaps put the DOSBOX executable inside as well).

We then create the soft directory symlink by running the following command in a CMD prompt.
Note that I prefer to use the UNC path, because I think it’s more reliable than a drive letter to a share (that might be disconnected), but you can use both.
mklink /D C:\DOSPROGS\P-DRIVE \\server\P-share
mklink /D C:\DOSPROGS\P-DRIVE P:\

In DOSBOX we can now mount it using the symlink.
MOUNT P C:\DOSPROGS\P-DRIVE

Categories
blog cloud howto

Enable or disable password expiration for Office365 users using Powershell

You can change the general password expiration policies in the online GUI but for individual users and to check the state you need to use powershell.

  1. First make sure you have installed the required module for powershell.
    – Azure Active Directory Module for Windows Powershell.
    On Windows 10 you can open powershell with run as administrator and run the command: Install-Module -Name MSOnline
    Or you can download the installer from:
    http://connect.microsoft.com/site1164/Downloads/DownloadDetails.aspx?DownloadID=59185
    You need the AdministrationConfig-V1.1.166.0-GA.msi file.
    – For this to install you need to have the Microsoft Online services sign-in assistant > 7.
    If you don’t have it you can download it from:
    https://www.microsoft.com/en-us/download/details.aspx?id=41950
  2. Now that we have the necessary software we can connect, start powershell for windows azure ad and execute:

    Connect-MsolService
  3. Check if password expiration is set for any of the users:
    Get-MSOLUser | Select UserPrincipalName, PasswordNeverExpires
  4. Change password expiration for all users:
    Get-MSOLUser | Set-MsolUser -PasswordNeverExpires $true
    Get-MSOLUser | Set-MsolUser -PasswordNeverExpires $false
  5. Change password expiration for just one user:
    Set-MsolUser -UserPrincipalName u1@dm.tld -PasswordNeverExpires $true
    Set-MsolUser -UserPrincipalName u1@dm.tld -PasswordNeverExpires $false
Categories
blog howto server windows

Can’t find script engine “VBScript” for script …

I recently came across this error while trying to execute a VBscript.

Can’t find script engine “VBScript” for script …

After some troubleshooting this was related to the uninstall of McAfee antivirus software.
McAfee antivirus intercepts all VBscript execution by changing the executable that runs the scripts.
After uninstallation, this change was not rolled back and VBscript execution would faill unless explicitely called by wscript.exe or cscript.exe.

Solution is to revert he change in the Windows registry.
In the following registry key:
HKEY_CLASSES_ROOT\CLSID\{B54F3741-5B07-11cf-A4B0-00AA004A55E8}\InprocServer32
Find the value named (Default) of type REG_SZ and change the data back to:
C:\Windows\system32\vbscript.dll
instead of:
c:\Program Files\Common Files\McAfee\SystemCore\ScriptSn.20110218083735.dll

You have the adjust the permissions on the key InprocServer32 to give write permission to Administrator (or your user).

If your problem is unrelated to McAfee and the registry value is correct you might have to re-register the DLL’s.
Open a CMD with elevated privileges (run as administrator) and execute the following commands:

cd "%systemroot%\system32"
regsvr32 jscript.dll
regsvr32 vbscript.dll
cd "%systemroot%\SysWow64"
regsvr32 jscript.dll
regsvr32 vbscript.dll

More information and information that i used to troubleshoot this issue:
http://answers.microsoft.com/en-us/windows/forum/windows_7-performance/cant-find-script-engine-vbscript-for-script/960f24d1-bf92-4cec-b73e-520a04891073
https://community.mcafee.com/thread/50961?start=0&tstart=0

Categories
blog howto windows

Windows 2012 Server Manager refresh failed, requires a restart

The request to add or remove features on the specified server failed. the operation cannot be completed because the server that you specified requires a restart.

Role and feature refresh failed with the following error: The Request to list features available on the specific server failed. The operation cannot be completed, because the server that you specified requires a restart.

Restarting the server does not help.

Check the eventlog for an error from Service Control Manager ID 7041 that reads:

The MSSQL$MICROSOFT##WID service was unable to log on as NT SERVICE\MSSQL$MICROSOFT##WID with the currently configured password due to the following error:
Logon failure: the user has not been granted the requested logon type at this computer.

Service: MSSQL$MICROSOFT##WID
Domain and account: NT SERVICE\MSSQL$MICROSOFT##WID

This service account does not have the required user right “Log on as a service.”

Check the “Windows Internal Database” service is running, it probably is not and can’t start.

If this is a domain controller you can assign the logon as service right for the account using the “Default Domain Controllers Policy” GPO.

  1. Open gpmc.msc
  2. Select the “Default Domain Controllers Policy” under the “Domain Controllers” OU in the left tree.
  3. Right click on it and select edit.
  4. In the editor navigate to “Computer Configuration, Policies, Windows Settings, Security Settings, Local Policies, User Rights Assignments”.
  5. Open the properties of the “Log on as a service” item.
  6. Add the user “NT SERVICE\MSSQL$MICROSOFT##WID” (without quotes) using the Add User or Group button.
  7. Close the window with OK. Close the GPO editor.
  8. Run gpupdate and restart the computer.

If this is a normal member or standalone server you can assign the logon as service right for the account using the “Local Security Policy”.

  1. Open secpol.msc
  2. Navigate to” Local Policies, User Rights Assignments”.
  3. Open the properties of the “Log on as a service” item.
  4. Add the user “NT SERVICE\MSSQL$MICROSOFT##WID” (without quotes) using the Add User or Group button. If this is greyed out, than the item is set using Domain Group Policies (see above).
  5. Close the window with OK. Close the local security policy editor.
  6. Run gpupdate and restart the computer.